Creating a Multiboot USB Drive with Ventoy
Topics
Introduction#
During a deploy of our custom Linux Mint images in one of the labs at UFCG, I’ve learned about Ventoy – an interesting tool for creating bootable USB drives. Of all the tools I’ve used for this task (like Rufus and Etcher), Ventoy catched my interest for three reasons:
It does not require flashing the ISO into the USB drive
It allows you to add multiple ISO files to the USB drive, without tweaking with disk partitions
It allows you to choose which image to boot from at startup
Ventoy is also very easy to install and use, as it provides packages with graphical interface for Linux, so you don’t have to worry with cryptic shell commands. But that’s boring, so we’re going to get our hands dirty anyways 🥱
How Ventoy works?#
While installing Ventoy on an USB drive, it will create two main partitions:
The EFI partition (formatted as
FAT), where Ventoy’s bootloader and configurations are stored, and only 32MB in sizeThe main partition (usually formatted as
exFATorFAT32), where you can place your ISO files
When booting from the USB drive, Ventoy’s bootloader will look for ISO files inside the main partition and list them at the boot menu. Please note that the disk layout may vary, depending on whether you choose the MBR or GPT partitioning scheme.
Using Ventoy on Linux#
As mentioned before, we’ll be installing Ventoy through CLI – like real Linux users would. So,
you’ll need to download the binary packages (e.g. ventoy-1.0.XX-linux.tar.gz file), which are
avaliable at SourceForge. I recommend unpacking
the tarball at /opt for convenience.
Inside the package, you’ll see a bunch of executable files. Since we won’t use a graphical
interface, our focus is in the Ventoy2Disk.sh script.
If you wish to install Ventoy using a graphical interface, execute one of the files labeled with the
VentoyGUIprefix. Please note that you have to choose the executable with the same architecture as your machine (e.g.VentoyGUI.x86_64for 64-bit machines).You may also use an Web UI by executing the
VentoyWeb.shand opening your browser athttp://localhost:24680
If you plan to use Ventoy frequently, it might be interesting to add the executables to your
$PATH. For that, I have an article on how to install packages manually on Linux, which you can
find here.
Installing Ventoy on a USB drive#
Now that we have the package set up on our machine, let’s take a look on how to use
Ventoy2Disk.sh. After running the script without any arguments, we get the following output:
[...]
Usage:  Ventoy2Disk.sh CMD [ OPTION ] /dev/sdX
  CMD:
   -i  install Ventoy to sdX (fails if disk already installed with Ventoy)
   -I  force install Ventoy to sdX (no matter if installed or not)
   -u  update Ventoy in sdX
   -l  list Ventoy information in sdX

  OPTION: (optional)
   -r SIZE_MB  preserve some space at the bottom of the disk (only for install)
   -s/-S       enable/disable secure boot support (default is enabled)
   -g          use GPT partition style, default is MBR (only for install)
   -L          Label of the 1st exfat partition (default is Ventoy)
   -n          try non-destructive installation (only for install)
Although the text is pretty straightforward, we need to find which device is our USB drive –
specified by /dev/sdX. For that, you can use the lsblk command to list all the block devices in
the system. Here’s a sample output for this command:
user@host:~# lsblk
NAME   MAJ:MIN RM   SIZE RO TYPE MOUNTPOINTS
[...]
sda      8:0    0 238,5G  0 disk
├─sda3   8:3    0 237,5G  0 part /
└─sda4   8:4    0     1G  0 part /boot/efi
sdb      8:16   1   7,5G  0 disk
├─sdb1   8:17   1   7,5G  0 part /media/dougsilva/Ventoy
└─sdb2   8:18   1    32M  0 part
[...]
USB devices are usually mounted at the /media directory. In my case, the USB drive is
represented by sdb device, so I must pass /dev/sdb as the installation device to the
Ventoy2Disk.sh script. Below are some examples on how to configure your installation:
# Install Ventoy on /dev/sdX. This will fail if Ventoy is already installed.
sudo ./Ventoy2Disk.sh -i /dev/sdX

# Force install on /dev/sdX, ignoring any existent Ventoy installation
sudo ./Ventoy2Disk.sh -I /dev/sdX

# Install on /dev/sdX while keeping a 500MB free space at the end of the device
sudo ./Ventoy2Disk.sh -i -r 500 /dev/sdX

# Install on /dev/sdX with GPT partition style and labelling the main partition as "Multiboot USB"
sudo ./Ventoy2Disk.sh -i -g -L "Multiboot USB" /dev/sdX
Please note that installing Ventoy WILL ERASE ALL DATA FROM THE DEVICE, so you should backup any important files from the USB drive before installation. Also, while installing through command-line, be careful to not mistake your USB drive for another device.
You can also use the
fdisk -lcommand to list the devices of your machine with a more verbose output. This allows you to search for a device withgrep(i.e.fdisk -l | grep "YOUR_DEVICE").
Booting up the USB drive#
After the installation is complete, you can simply drag-and-drop your ISO files into the main partition, reboot your machine and boot from the USB drive. If you had no unpleasant surprises during installation, you should see the following screen:
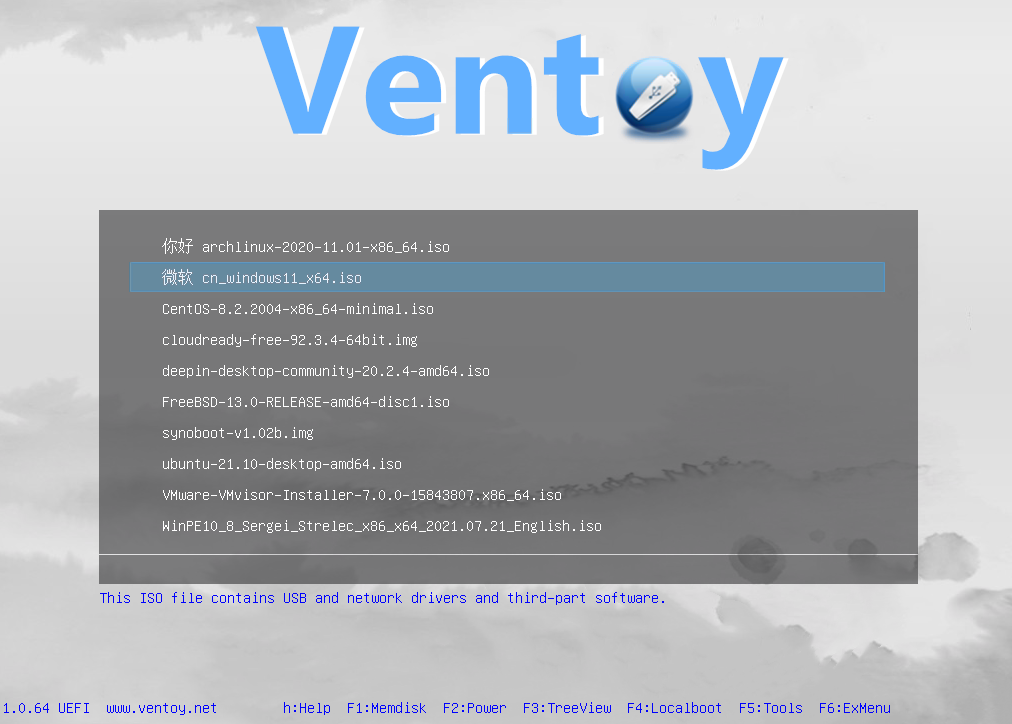
From here, simply choose which ISO you wish to boot, and select the Boot in normal mode option.
For more information about boot modes, read
the documentation.
Some machines have a hot key for entering the Boot Menu at startup, so you don’t need to manually change the boot order in your BIOS. Please check out this list for reference.
Considerations about Secure Boot#
Since Ventoy 1.0.76, Secure Boot support is enabled by default. This means that Ventoy should work whether Secure Boot is enabled in your machine or not.
If Secure Boot is indeed enabled in your machine, you should see the screen below when booting Ventoy for the first time. Please follow these instructions in Ventoy’s documentation on how to allow Ventoy on Secure Boot.
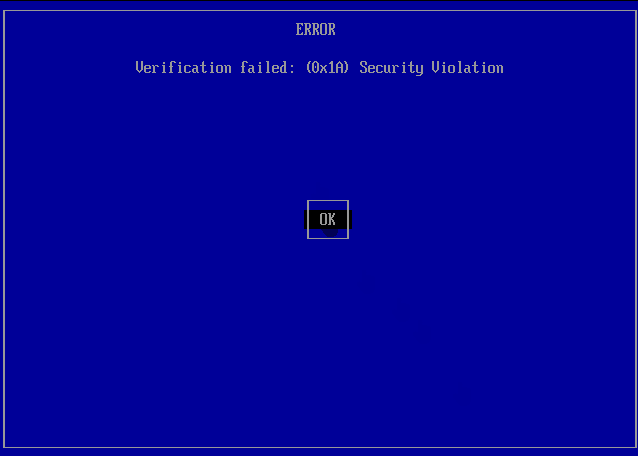
However, if you see another error screen while booting Ventoy, your system may not support Ventoy on Secure Boot. As such, you’ll need to disable the option in your Ventoy installation and your BIOS.
Conclusion#
Until now, Ventoy has proved to be a handy tool for testing Linux distributions and keeping backup ISOs for system recovery. It’s easy to install and use, it’s lightweight and also quite fast when compared to similar tools.
While I have not tried installing a system through Ventoy, I plan to try it out soon with Fedora, and if everything goes as expected, I may use it to setup a dual-boot installation with Windows in the (not so) far future.